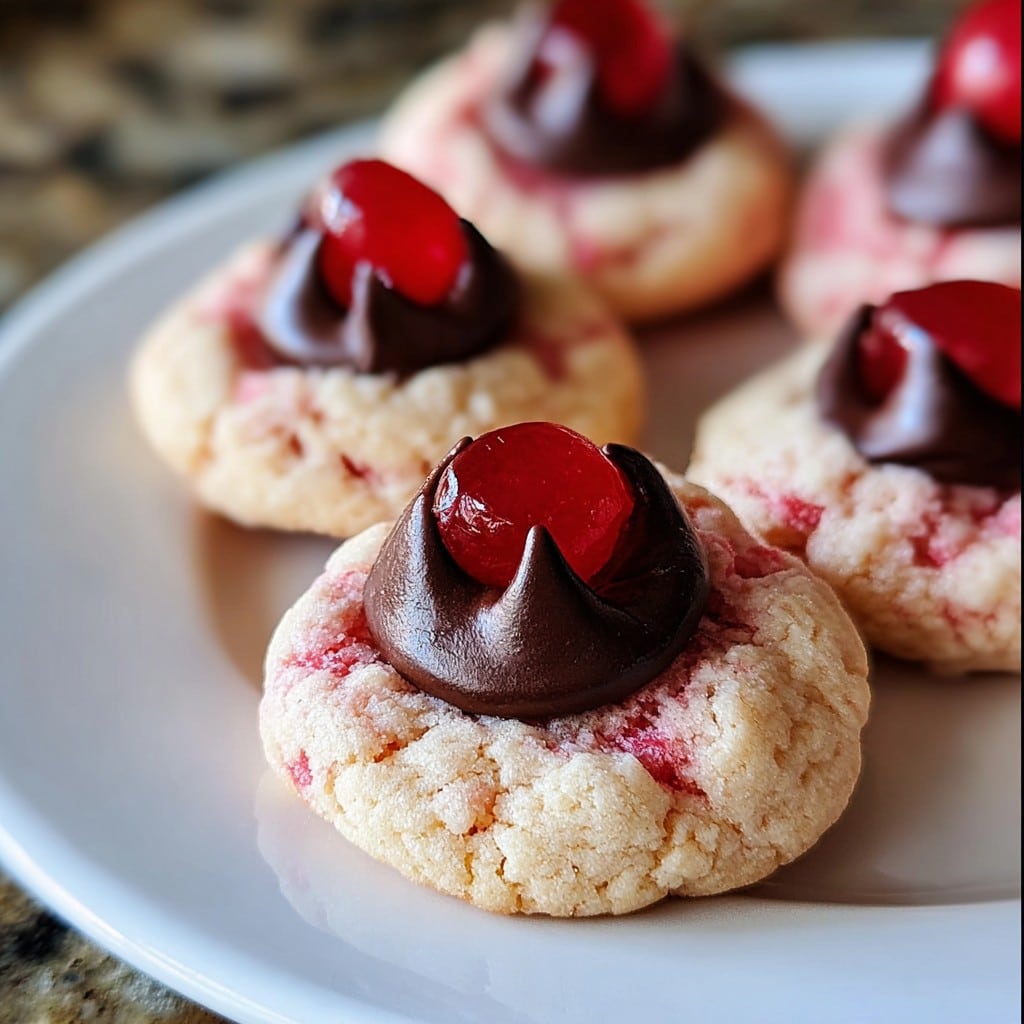
Cherry Kiss Cookies
Let me just say: Cherry Kiss Cookies are basically the official sign in my family that the holidays have started (though I’d honestly eat these in July if cherries call my name). The first time I tried baking these, I exploded cherry juice all over my favorite pajama pants (RIP, penguin bottoms), but hey, that’s why aprons exist, right? These are messy, cheerful, and taste like you raided a candy shop at midnight. Not fancy bakery stuff — more like something you snuck from grandma’s old Tupperware when you weren’t supposed to.
Why You’ll Love This (Or: Why I Keep Making Them)
I make this when I’ve got that can of maraschino cherries staring me down from the back of my fridge — you know the one. My family goes bonkers for the combo of cherry and chocolate, and I swear my neighbor drops hints just before Christmas (subtle, Karen, very subtle). The cookie dough itself is buttery and basically a blank canvas for whatever you want — I mean, I once ran out of almond extract and just used vanilla, nobody even noticed. Oh, and when you plop that Hershey’s Kiss on top? Pure magic, even if sometimes they get a wobbly tilt and look like they’re melting off the side (mine usually do!).
What You’ll Need (Plus My Usual Swaps)
- 1 cup (2 sticks) unsalted butter, softened (I sometimes cheat and use salted, just skip the pinch of salt if you do)
- 1 cup powdered sugar (my grandmother always insisted on Domino, but honestly any is fine, don’t fuss)
- 2 teaspoons maraschino cherry juice, straight from the jar (don’t be afraid to splash a bit extra if you love cherry)
- 1/2 teaspoon almond extract (substitute vanilla if you’re out, it’s still tasty)
- 2 1/4 cups all-purpose flour
- Pinch of salt (skip this if you used salted butter earlier!)
- 1/2 cup chopped maraschino cherries, patted dry (I’ve never tried fresh but if you’re braver than me, let me know how it turns out!)
- About 30 Hershey’s Kisses, unwrapped (I usually buy the big bag so I can snitch a couple while baking, just being honest)
How I Make Cherry Kiss Cookies (With The Occasional Oops)
- Fire up your oven to 350°F (180°C). Line a baking sheet with parchment or just butter it if you’re out of parchment — I’ve done both, neither were disasters.
- Cream together the softened butter and powdered sugar until it’s light and fluffy — I use a hand mixer but you could do it with a wooden spoon if you want a workout. This is probably where I sneak a little taste, for science.
- Add the maraschino cherry juice and almond extract. Mix until it’s all pink and smelling like a retro soda shop.
- Slowly add the flour and the pinch of salt (only if your butter wasn’t salty) until it forms a soft dough. Don’t panic if it looks crumbly at first — just keep mixing, it’ll come together, promise.
- Fold in the chopped cherries. Don’t worry if your dough turns neon pink — that’s half the fun, and kids love it.
- Now, scoop out about a tablespoon of dough (or just grab a walnut-sized lump if you prefer eyeballing things) and roll into balls. Place them on your baking sheet with a little space between so they don’t smush together.
- Bake for 10-12 minutes. You want them barely golden underneath — if the edges look too brown, they’re probably a tad overdone. They should be soft at this stage, not crispy.
- As soon as you pull them out, gently press a Hershey’s Kiss into the center of each cookie. Don’t be alarmed if the Kiss gets a bit melty; that’s just its way of settling in.
- Let the cookies cool completely before moving them, or else they’ll fall apart and you’ll have cherry-scented cookie crumbles everywhere (I’ve learned form experience!).

Notes That Only Trial and Error Taught Me
- If your cherries are too wet, your dough will go soggy and weird — so, really, get them dry. I once used a hair dryer… would not recommend.
- I know it’s tempting to eat these warm but honestly, give them 30 minutes; the Kisses go from melty puddles to perfectly gooey.
- If you want an even pinker color, a drop or two of food coloring won’t hurt — but it’s totally optional.
If You Want to Get Adventurous (Or, Experiments Gone Wild)
- Try swapping out the almond extract for orange or lemon — I did orange once and it was better than expected.
- Pressed in a mini Rolo instead of a Kiss? Actually, I think it’s a little too sweet, but worth a go if you’re a caramel fan.
- Used white chocolate Kisses once and honestly, my nephew said it looked like “ghost hats,” which cracked me up.

What You Need (But Here’s a Hack If You Don’t Have It)
- Baking sheet (though, once, I doubled up two pizza pans and it worked out fairly well)
- Parchment paper — great for easy cleanup, but you can just grease the pan, no biggie
- Mixing bowls — nothing fancy, your biggest cereal bowl is fine for the dough
- Hand mixer or sturdy spoon for creaming — on second thought, hand mixers make life easier
How to Store Them (If They Last That Long)
Pop these into an airtight tin or container at room temp and they’re still soft two days later (though honestly, in my house they rarely last beyond an afternoon — I blame my partner and, okay, myself). If you want them to last more than a week, you can freeze unbaked dough balls and bake straight from the freezer, just add a minute or two.

How I Like to Serve Cherry Kiss Cookies
Sometimes I pile them on a vintage plate and pretend I’m having a “grown-up tea” (then my cat tries to eat one, of course). My nephew insists on a tall glass of milk, but I’ve had them with coffee and they’re honestly delicious. They look extra cute in those crinkly cupcake papers if you’re feeling fancy.
Stuff I’ve Learned (Usually The Hard Way)
- If you rush putting the kisses on, they slide right off, and you get a cookie with a bald spot. So, really, wait a minute after baking.
- Using really cold butter makes the dough hard to mix. I tried zapping it in the microwave, but it ended up half liquid, oops — just give your butter a little counter time before you start.
FAQ (Real Questions From Real, Snack-Loving People)
- Can I use cherry pie filling instead of maraschino cherries? I wouldn’t recommend — it’s just way too sloshy. The cookies turned out like sad pink pancakes.
- My cookies spread too much, what’s up? Probably your butter was too soft, or your cherries were still juicy. Dab them dry. Paper towels work, or just a clean tea towel.
- Can I double the recipe? Oh for sure, I’ve even tripled it at Christmas. But you’ll need a big bowl, obviously.
- Are they gluten free? As written, nope. But if you’ve got a favorite gluten-free flour blend, swap it in, just know the texture might change a bit.
Anyway, if you bake these and the house smells like a sweet-shop exploded, you’re doing it right. Pink fingers and gooey chocolate smudges are part of the experience. Enjoy!
Ingredients
- 1 cup (2 sticks) unsalted butter, softened (I sometimes cheat and use salted, just skip the pinch of salt if you do)
- 1 cup powdered sugar (my grandmother always insisted on Domino, but honestly any is fine, don’t fuss)
- 2 teaspoons maraschino cherry juice, straight from the jar (don’t be afraid to splash a bit extra if you love cherry)
- 1/2 teaspoon almond extract (substitute vanilla if you’re out, it’s still tasty)
- 2 1/4 cups all-purpose flour
- Pinch of salt (skip this if you used salted butter earlier!)
- 1/2 cup chopped maraschino cherries, patted dry (I’ve never tried fresh but if you’re braver than me, let me know how it turns out!)
- About 30 Hershey’s Kisses, unwrapped (I usually buy the big bag so I can snitch a couple while baking, just being honest)
Instructions
-
1Fire up your oven to 350°F (180°C). Line a baking sheet with parchment or just butter it if you’re out of parchment — I’ve done both, neither were disasters.
-
2Cream together the softened butter and powdered sugar until it’s light and fluffy — I use a hand mixer but you could do it with a wooden spoon if you want a workout. This is probably where I sneak a little taste, for science.
-
3Add the maraschino cherry juice and almond extract. Mix until it’s all pink and smelling like a retro soda shop.
-
4Slowly add the flour and the pinch of salt (only if your butter wasn’t salty) until it forms a soft dough. Don’t panic if it looks crumbly at first — just keep mixing, it’ll come together, promise.
-
5Fold in the chopped cherries. Don’t worry if your dough turns neon pink — that’s half the fun, and kids love it.
-
6Now, scoop out about a tablespoon of dough (or just grab a walnut-sized lump if you prefer eyeballing things) and roll into balls. Place them on your baking sheet with a little space between so they don’t smush together.
-
7Bake for 10-12 minutes. You want them barely golden underneath — if the edges look too brown, they’re probably a tad overdone. They should be soft at this stage, not crispy.
-
8As soon as you pull them out, gently press a Hershey’s Kiss into the center of each cookie. Don’t be alarmed if the Kiss gets a bit melty; that’s just its way of settling in.
-
9Let the cookies cool completely before moving them, or else they’ll fall apart and you’ll have cherry-scented cookie crumbles everywhere (I’ve learned form experience!).
Approximate Information for One Serving
Nutrition Disclaimers
Number of total servings shown is approximate. Actual number of servings will depend on your preferred portion sizes.
Nutritional values shown are general guidelines and reflect information for 1 serving using the ingredients listed, not including any optional ingredients. Actual macros may vary slightly depending on specific brands and types of ingredients used.
To determine the weight of one serving, prepare the recipe as instructed. Weigh the finished recipe, then divide the weight of the finished recipe (not including the weight of the container the food is in) by the desired number of servings. Result will be the weight of one serving.
Did you make this recipe?
Please consider Pinning it!